

Coconut oil is one of the most versatile natural oils, widely used for cooking, skincare, hair care, and overall wellness.…
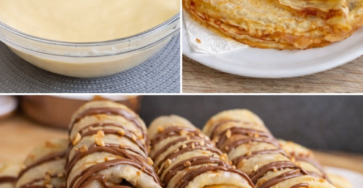
Soft Homemade Crepes Recipe
Soft Homemade Crepes (Perfect for Sweet Fillings) 🥞 Ingredients 👩🍳 Instructions 🍫 Serving Ideas 🔥 Viral Caption Idea “These soft…

Natural Eye Health Remedy for Better Vision & Comfort
Introduction This natural eye-support remedy is made with simple ingredients known for their antioxidant and anti-inflammatory properties. It may help…
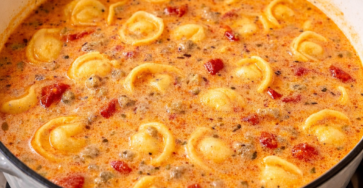
Creamy Tomato Tortellini Soup Recipe (Easy One-Pot Dinner)
Creamy Tomato Tortellini Soup Introduction This Creamy Tomato Tortellini Soup is the ultimate comfort food. Rich, velvety, and packed with…
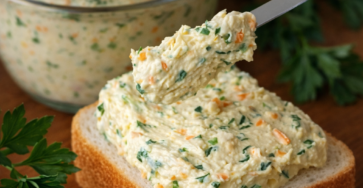
Creamy Garlic & Herb Butter Spread
Creamy Herb Butter Spread This creamy herb butter spread is smooth, flavorful, and perfect for spreading on fresh bread, toast,…

Cheesy Stuffed Flatbread (Soft & Crispy Pan-Fried Bread)
Cheesy Stuffed Flatbread (Pan-Fried) These soft and golden cheese-stuffed flatbreads are crispy on the outside and irresistibly gooey on the…

🍲 Tomato Tofu Soup – A Light, Healthy, and Comforting Recipe
Warm, light, and incredibly soothing, this Tomato Tofu Soup combines fresh tomatoes, tender tofu, and herbs for a healthy meal…

🍽️ Garlic Butter Chicken Bites with Creamy Parmesan Pasta
Garlic Butter Chicken Bites with Creamy Parmesan Pasta Description Juicy garlic butter chicken bites smothered in a rich, creamy sauce,…
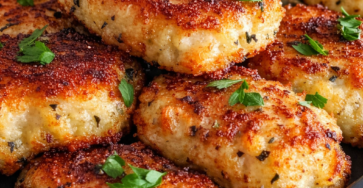
Crispy Garlic Parmesan Potato Patties
Crispy Garlic Parmesan Potato Patties Description These Crispy Garlic Parmesan Potato Patties are golden on the outside, soft on the…

Spinach Feta Egg Muffins
Spinach & Feta Egg Muffins Ingredients Instructions Tips